Inklayers: a program to generate PDF animations from SVG images
by Tullio Facchinetti
Inklayers was born to make the editing of “animated” PDF presentations with LaTeX Beamer easier.
The PDF format do not actually allow animations, but a similar effect can be obtained with a sequence of slides.
The idea is to elaborate the graphical content with an user-friendly program for editing vector graphics, and to export a set of PDF images that can be arranged into the PDF presentation.
For this purpose, I chosen Inkscape and the SVG file format. Despite I don’t like too much XML, the SVG format is a standard and solid format. And Inkscape is the best opensource program to deal with SVG graphics.
SVG layers
The name of inklayers comes from Ink(scape) + layers.
Layers are common elements in graphics programs. They allow to group together different elements of the entire image, in order to facilitate their management.
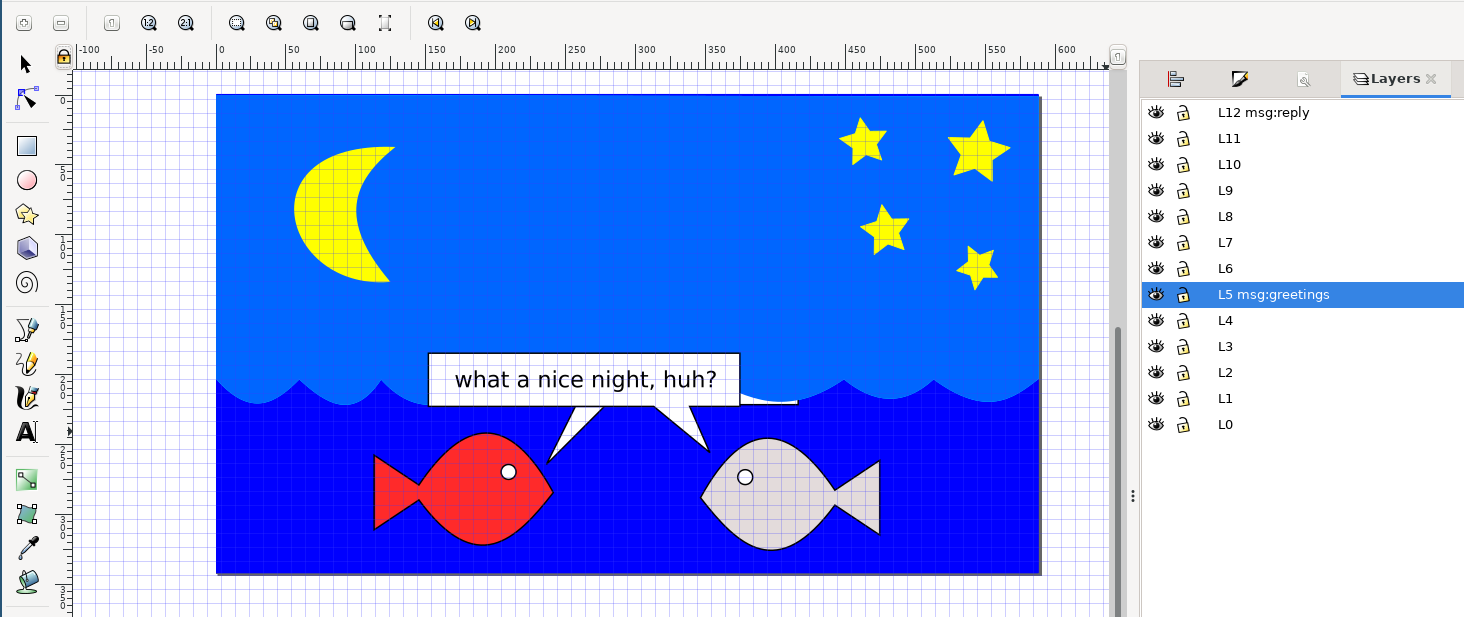
During the editing of an image with Inkscape, layers are handy for several purposes. Different elements of the picture can be logically grouped together into different layers. Each layer can be identified by its name; renaming is allowed by Inkscape. E.g., in a flowchart, we can use different layers for blocks of various type, arrows, text. A layer can be hidden to focus on the current content. A layer can be locked, so that its content can not be selected nor modified. Content can be moved from one layer to another. Layers are organized into a stack, and the ordering of layers can be changed anytime.
A pane can be opened in Inkscape to view and manage the layers.
SVG layers and inklayers
Inklayers takes an SVG image and an external specfile, a file with the specifications of the slides to generate, and extracts the content from the SVG image by combining the elements composing the image itself, according to the layers and the indications contained in the specfile. Inklayers supports specfiles written in JSON, TOML and INI formats.
An example of specfile using the JSON format looks like the following:
{
  "input": {
    "filename": "fishes.svg"
  },
  "output": {
    "type": "png",
    "filename": "%b-%n.%e",
    "slides": [
      {"include": ["L0"]},
      {"include": ["L0", "L1"]},
      {"include": ["#0-#2"]},
      {"include": ["#0-#3"]},
      {"include": ["#0-#4"]},
      {"include": ["#0-#5"]},
      {"include": ["#0-#6"], "exclude": ["L5 msg:greetings"]},
      {"include": ["#0-#7"], "exclude": ["L5 msg:greetings"]},
      {"include": ["#0-#8"], "exclude": ["L5 msg:greetings"]},
      {"include": ["#0-#9"], "exclude": ["L5 msg:greetings"]},
      {"include": ["#0-#10"], "exclude": ["L5 msg:greetings"]},
      {"include": ["#0-#11"], "exclude": ["L5 msg:greetings"]},
      {"include": ["#0-#12"], "exclude": ["L5 msg:greetings"]},
      {"include": ["#0-#12"], "exclude": ["L5 msg:greetings", "L12 msg:reply"]}
    ]
  }
}
The specfile is tied to the image.
The filename parameter under the input field specifies - well - the name of the input image file.
The slides parameter is a list of the slide files that will be generated by Inklayers.
For each slide, it is possible to specify the layers to include and the ones to exclude.
Layers can be specified either by name or by index.
The layer number 0 is the one at the bottom of the list in the Inkscape pane.
The notation #N refers to the layer with index N.
The notation #N-#M indicates a range of layers from index N to M.
Layers are excluded by default. This means that, if a layer is not explicitly included in the slide, it does not appear in it. On the other hand, a layer can be explicitly excluded. This is helpful when a range of layers needs to be included, and an intermediate layer has to be excluded.
In the example, each generated slides is in the png format.
The output format can be chosen among the ones that can be exported by Inkscape.
As of Inkscape version 1.1.1, it supports svg, png, ps, eps, pdf, emf, wmf and xaml.
The name of the output file is specified by C-like placeholders, where %b is the name of the input file (in the example, it is fishes), %n is the number of the slide, and %e is the extension that depends from the output file type.
Example
Supposing that the above specfile is named fishes2.json, the following command
inklayers fishes2.json
generates the its output within the output/ subdirectory.
Its content is as follows:
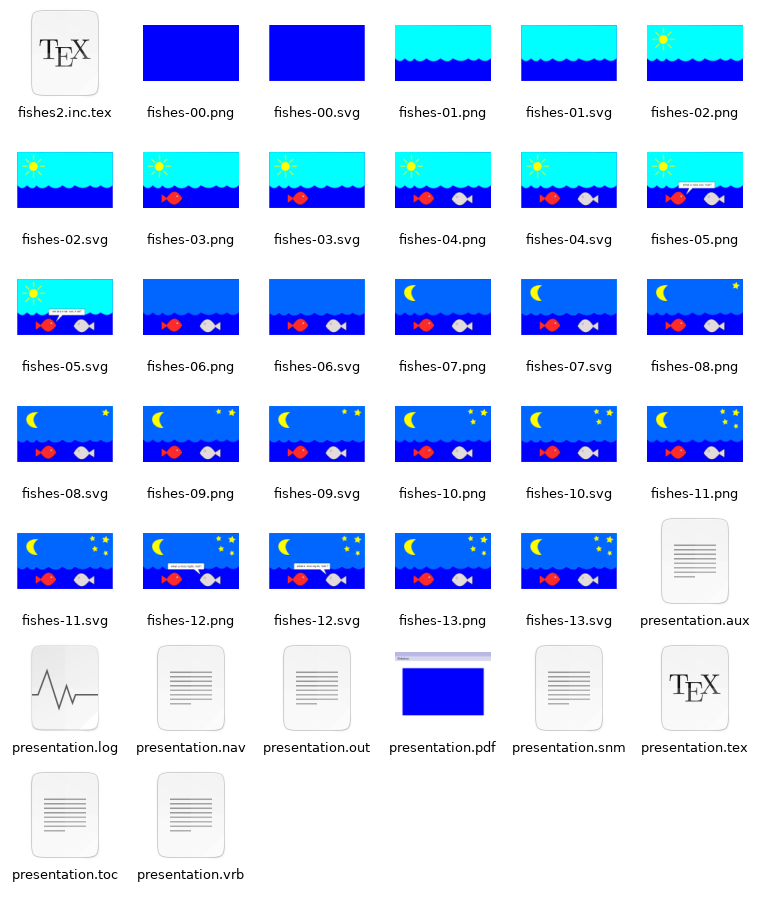
Each slide is saved as SVG file and the corresponding converted PNG file.
As can be seen in the picture, each slide contains a slightly different combinations of the elements in the original image.
Animation with LaTeX Beamer
The slides can be inserted within a Beamer presentation in order to generate an animation effect.
For convenience, Inklayers generates a LaTeX template within the output/ directory, and compiles it into the PDF presentation.
The most relevant part of the LaTeX is put within the fishes2.inc.tex file, and looks like the following:
\includegraphics<1|handout:0>[width=1.0\columnwidth]{fishes-00.png}%
\includegraphics<2|handout:0>[width=1.0\columnwidth]{fishes-01.png}%
\includegraphics<3|handout:0>[width=1.0\columnwidth]{fishes-02.png}%
\includegraphics<4|handout:0>[width=1.0\columnwidth]{fishes-03.png}%
\includegraphics<5|handout:0>[width=1.0\columnwidth]{fishes-04.png}%
\includegraphics<6|handout:0>[width=1.0\columnwidth]{fishes-05.png}%
\includegraphics<7|handout:0>[width=1.0\columnwidth]{fishes-06.png}%
\includegraphics<8|handout:0>[width=1.0\columnwidth]{fishes-07.png}%
\includegraphics<9|handout:0>[width=1.0\columnwidth]{fishes-08.png}%
\includegraphics<10|handout:0>[width=1.0\columnwidth]{fishes-09.png}%
\includegraphics<11|handout:0>[width=1.0\columnwidth]{fishes-10.png}%
\includegraphics<12|handout:0>[width=1.0\columnwidth]{fishes-11.png}%
\includegraphics<13|handout:0>[width=1.0\columnwidth]{fishes-12.png}%
\includegraphics<14|handout:0>[width=1.0\columnwidth]{fishes-13.png}%
This is the Beamer code to include the sequence of PNG files and create the animation.
If you go through the generated PDF presentation, you obtain the following effect:

Try yourself by downloading the PDF presentation and moving through the pages. Don’t forget to correctly set up the software to display the presentation so that you can advance one page at a time!